First described by Aubaniac in 1952, central venous catheterization, or central line placement, is a time-honored and tested technique of quickly accessing the major venous system. Benefits over peripheral access include greater longevity without infection, line security in situ, avoidance of phlebitis, larger lumens, multiple lumens for rapid administration of combinations of drugs, a route for nutritional support, fluid administration, and central venous pressure monitoring. Central vein catheterization is also referred to as central line placement.
The image below depicts central line equipment.
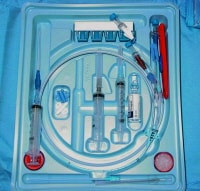 Central venous catheter equipment. Image courtesy of Wikimedia Commons.
 Overall complication rates range up to 15%,[1, 2, 3, 4] with mechanical complications reported in 5-19% of patients,[5, 6, 7] infectious complications in 5-26%,[1, 2, 4] and thrombotic complications in 2-26%.[1, 8] These complications are all potentially life-threatening and, invariably, consume significant resources to treat. Placement of a central vein catheter is a common procedure, and house staff require substantial training and supervision to become facile with this technique. A physician should have a thorough foreknowledge of the procedure and its complications before placing a central vein catheter.
The supraclavicular approach was first put into clinical practice in 1965 and is an underused method for gaining central access. It offers several advantages over the infraclavicular approach to the subclavian vein. At the insertion site, the subclavian vein is closer to the skin, and the right-sided approach offers a straighter path into the subclavian vein. Also, this site is often more accessible during CPR and during active surgical cases. Lastly, in patients who are obese, this anatomic area is less distorted.
Nevarre et al published a review of the literature and his own series of 178 supraclavicular line placements. He reported 1 pneumothorax, 1 malposition, and 2 instances of inability to thread the wire. The overall complication rate was 0.56%. This site is likely among the safest approaches for central venous access (but note that an experienced surgeon performed the procedures reported by Nevarre).[5]
A study by Muhm et al of 208 supraclavicular lines in 168 hemodialysis patients focused on large bore catheters such as may be needed for hemodialysis or resuscitation of patients with trauma or sepsis. Complications included 1 pneumothorax, 7 arterial punctures, and 2 thoracic duct punctures without sequelae. Catheter malpositions occurred only sporadically (1%). Thus, even with large bore catheters, the supraclavicular approach may be a preferable route of placement.[6]
Czarnik et al published a study demonstrating a high overall success rate (92%) of the supraclavicular approach in 370 patients. Most of the patients (78.4%) were mechanically ventilated during the procedure and the overall complication rate was 1.7%, including 3 subclavian artery punctures and 3 contralateral subclavian vein catheterizations. No life-threatening complications occurred. The authors noted this approach to be another viable site for venous access, even in those being mechanically ventilated.[9]
These studies are encouraging, especially considering that a large percentage of the studied patients represented a situation in which the line placement was complicated or difficult. However, the number of patients included is still small, and the operators were experienced with this technique.
While ultrasonographic guidance has proved to be a useful adjunct for internal jugular cannulation, its use for subclavian routes has been infrequently studied. Given the anatomy of the supraclavicular approach, there is little room to effectively position the transducer while manipulating the needle. Using an ultrasound transducer to locate and superficially mark the vessel prior to needle insertion remains an option.[10]
NextIndicationsVolume resuscitationEmergent venous accessNutritional supportAdministration of caustic medications (eg, vasopressors)Central venous pressure monitoringTransvenous pacing wire introductionHemodialysisPulmonary artery catheterizationPreviousNextContraindicationsAbsolute contraindications to central venous access Distorted anatomy (eg, vascular injury, prior surgery, radiation history)Infection at insertion siteRelative contraindications to central venous access Presence of anticoagulation or bleeding disorderPatient who is excessively underweight or overweightUncooperative patientCurrent or possible thrombolysisAbsolute contraindications to the supraclavicular approach Trauma to ipsilateral clavicle, neck, or subclavian vesselsCoagulopathy (Direct pressure to stop bleeding can not be applied to the subclavian vein or artery due to their location beneath the clavicle.) Relative contraindications to the supraclavicular approach Chest wall or neck deformityChronic obstructive pulmonary disease (COPD)PreviousNextAnesthesiaLocal anesthesia using 1% lidocaine is required.For more information, see Local Anesthetic Agents, Infiltrative Administration.PreviousNextEquipmentCentral venous catheter tray (line kit)Sterile glovesAntiseptic solution with skin swabsSterile drapes or towelsSterile gownSterile saline flush, approximately 30 mLLidocaine 1% (obtain additional vial of lidocaine 1%, if needed)GauzeDressingScalpel, No. 11PreviousNextPositioningPlace the patient in the supine position.If possible, the bed should be raised to a comfortable height for the operator so bending over is unnecessary.Needle insertion site options include the following: One centimeter lateral to the lateral border of the clavicular head of the sternocleidomastoid muscle and one centimeter superior to the clavicle (The needle approach should bisect the angle of the muscle border and the clavicle.) One centimeter medial and one centimeter superior to the midpoint of the clavicle (Direct the introducer needle to the ipsilateral sternoclavicular joint.)[11] Just posterior to the clavicle at the middle/medial third junction of the clavicle (Direct the needle toward the ipsilateral sternoclavicular joint with the needle oriented parallel to the coronal plain.)[12] Options for directing the needle include the following: Contralateral nipple: The contralateral nipple may be used as a target for directing the introducer needle.Sternal notch: A point just superior and posterior to the sternal notch may be used as a target for directing the introducer needle. PreviousNextTechniqueExplain the procedure, benefits, risks, and complications and obtain signed informed consent.Position the patient.Identify landmarks.Open the line kit, and position the equipment within easy reach. One may want to retract the J-wire into the plastic loop sheath for easy directing into the introducer needle. Also, uncap the distal lumen, which is typically the brown lumen. Prepare the insertion site with the iodine or alcohol solution provided in the kit. This amount of preparation is often inadequate, and a wide area around the insertion site should be liberally prepared with 4 x 4 cm gauze soaked in a povidone iodine solution (eg, Betadine). Prepare the neck as well, in case the initial approach fails and another approach must be attempted. Put on sterile mask, gown, and gloves.Drape the patient in a sterile fashion with the insertion site exposed.Using a generous amount of lidocaine, infiltrate the skin and subcutaneous tissue.Position the bevel of the introducer needle in line with the numbers on the syringe. Upon insertion, orient the bevel to open caudally so as to facilitate the caudal progression of the guide wire down the vein toward the right atrium. While continuing to aspirate with the syringe, insert the introducer needle along the 45° bisection of the approximately 90° angle formed by the superior aspect of the clavicle and the lateral border of the sternocleidomastoid muscle. The needle should be virtually parallel to the chest wall in the coronal plane. If the vein is difficult to locate, remove the introducer needle, flush it clean of clots, and try again. Change insertion sites after 3 unsuccessful passes with the introducer needle. When venous blood is freely aspirated, disconnect the syringe from the needle, immediately occlude the lumen to prevent air embolism, and reach for the guide wire. Insert the guide wire through the needle into the vein.Advance the wire until it is mostly in the vein or until ectopy is seen on the cardiac monitor. Then, retract the wire a 3-4 cm. Holding the wire in place, withdraw the introducer needle and set aside.Use the tip of the scalpel to make a small stab just against the wire to enlarge the catheter entry site.Thread the dilator over the wire and into the vein with a firm and gentle twisting motion while maintaining control of the wire. Holding the wire in place, remove the dilator. To estimate the distance from the insertion site to the subclavian vein just over the atrium, the catheter can be held over the patient’s chest. Thread the catheter over the wire; then, thread the wire out of the distal (brown) lumen and grasp the wire. Continue to thread the catheter into the vein to the desired length. Hold the catheter in place, remove the wire, and occlude the open lumen.Attach a syringe with some saline in it to the hub and aspirate blood. Take needed samples and then flush the line with saline and recap. Repeat this step with all lumens. Verify line placement with chest radiograph. The catheter should end in the vena cava at the manubriosternal angle, not in the right atrium. Suture the catheter in place. For patient comfort, the clinician may need to anesthetize this area with lidocaine first.Apply a clean dressing.PreviousNextPearlsThe key to a successful line placement is meticulous preparation and setup before starting or donning sterile garb. This includes consideration of what equipment may be needed if complications arise. Use the same preparation technique every time this procedure is performed.Prepare a sterile field from the jaw to several fingerbreadths below the clavicle.The amount of lidocaine provided in most kits is often inadequate. The authors recommend supplementing the kit with a 10-mL syringe and a bottle of 1% lidocaine without epinephrine. In the technique first described by Yoffa in 1965, the needle is directed at an angle of 45 º from the sagittal plane and 15 º anterior from the coronal plane. Newer literature using 3-dimensional CT have shown higher success rates by placing the needle at the clavisternomastoid angle and directing the needle 10 º from the sagittal plan and 35 º posteriorly from the coronal plane. This change allows for the shortest distance to the target vessel and for the first rib to act as a physical barrier to reduce the risk of pneumothorax.[13] If the wire does not pass easily through the needle down the vein, remove the wire, reattach the syringe, and confirm that the needle is still in the lumen of the vein before reattempting the procedure. Beware a return of red or pulsatile blood. If this occurs, the wire is in an artery.Beware aspirating air bubbles through the probing introducer needle. This indicates a pneumothorax. (For details, see Medscape Reference article Tube Thoracostomy.) Anesthetize the suture site as well as the insertion site.Some clinicians find it useful to remove the contents of the line kit and lay them out in the order and configuration that they will be used. Never place equipment on a patient.Antibiotic ointments are contraindicated. Transparent dressings are not necessary.PreviousNextComplicationsComplication rates for the various approaches are shown in the table below.
Table. Complication Rates of Central Venous Catheterization[5, 6, 7, 9, 14, 15] (Open Table in a new window)
Internal JugularSubclavianFemoralSupraclavicularArterial puncture6.3-9.13.1-4.99.0-15.00.8-3.36Hematoma1.2-2.13.8-4.4N/AHemothoraxN/A0.1-0.6N/AN/APneumothorax1.5-3.1N/A0.48-0.56Thrombosis7.61.921.5N/ALocal site or systemic infection: Multiple studies have shown lower infection rates with the use of maximal sterile-barrier precautions, including mask, cap, sterile gown, sterile gloves, and large sterile drape. This approach has been shown to reduce the rate of catheter-related bloodstream infections and to save an estimated $167 per catheter inserted.[6] Arterial puncture: As in other central venous catheter approaches, lacerating the subclavian artery is theoretically possible. Also, the subclavian vein cannot be compressed; therefore, this approach should be avoided in patients who are anticoagulated. Hematoma: A hematoma usually requires monitoring only.Hemothorax: Check the chest radiograph for evidence of a hemothorax. If evidence is found, consult a surgeon immediately, and consider tube thoracostomy. Pneumothorax: Check a chest radiograph when finished or before switching to the contralateral side after failed insertion on one side. Catheter-related thrombosis: This complication might lead to pulmonary embolism.Air embolism: An air embolism is caused by negative intrathoracic pressure, with inspiration drawing air into an open line hub. Be sure the line hubs are always occluded, and note that placing the patient in the Trendelenburg position lowers this risk. If air embolism occurs, the patient should be placed in the Trendelenburg position with a left lateral decubitus tilt, which may prevent the movement of air into the right ventricle and onward. One hundred percent oxygen should be administered to speed the resumption of air. If a catheter is located in the heart, aspiration of air should be attempted. Dysrhythmias: Dysrhythmia is due to cardiac irritation by the wire or catheter tip. Placing a central venous catheter without a cardiac monitor is unwise. Atrial wall puncture: This complication leads to pericardial tamponade.Lost guide wire: If the clinician is not conscientious about maintaining control of the guide wire, it may be lost into the vein and require retrieval by interventional radiology. Anaphylaxis: Patients who are allergic to antibiotics may experience anaphylaxis upon insertion of an antibiotic-impregnated catheter. Catheter tip too deep: Check for this complication on the postprocedure chest radiograph, and pull the line back if the tip disappears into the cardiac silhouette. Catheter in the wrong vessel: When the subclavian catheter is not in the correct position, it usually deviates cranially up the internal jugular instead of down the subclavian vein. This complication is rare with the supraclavicular approach. Chylothorax: This complication is possible on the left side.Previous, Central Venous Access via Supraclavicular Approach to the Subclavian Vein


0 comments:
Post a Comment